Worked on tooling for my airplane today.
-
UncleJoseph

- Wuffle Initiate
- Posts: 1087
- Joined: Tue Jun 11, 2002 8:32 am
- Location: Central Michigan
- Contact:
-
Jeff Hauze

- Wuffle Trainer
- Posts: 1415
- Joined: Mon Mar 18, 2002 10:31 pm
Hehe, that's sweet. Back when I built houses(this is around the time the Iraq war was getting started) I built a house in the Camp Lejune area. Lots of fly overs. One day we're standing around outside the house in a clearing in the woods, and suddenly a super hornet(I think! It was moving fast) comes zipping over the tree-line, at just about tree-top level. No sound. After it passed over the clearing, that rolling thunder hit and we just alll looked at each other. My uncle(former airborne) and me shared a look, and a single phrase: "You're dead by the time you hear'em"
I suspect that people who speak or write properly are up to no good, or homersexual, or both

-
sinsual

- Bondsman of the Crimson Assfro
- Posts: 2192
- Joined: Thu Jun 20, 2002 7:14 am
- Location: Down the rabbit hole...
- Contact:
want to come organize my workshop while your at it?
www.evieshope.com
No infant should have Eye Cancer...
No infant should have Eye Cancer...
-
UncleJoseph
- Wuffle Initiate
- Posts: 1087
- Joined: Tue Jun 11, 2002 8:32 am
- Location: Central Michigan
- Contact:
-
UncleJoseph
- Wuffle Initiate
- Posts: 1087
- Joined: Tue Jun 11, 2002 8:32 am
- Location: Central Michigan
- Contact:
Well, it'll be a while. Average build time for a scratch-built airplane for someone who isn't retired is about 7-10 years. I hope I can finish it sooner. They key? Keeping to the plans, and not customizing.Raygun wrote:Awesome, dude. I honestly cannot wait to see this thing fly.
If you take away their comforts, people are just like any other animal.
-
UncleJoseph
- Wuffle Initiate
- Posts: 1087
- Joined: Tue Jun 11, 2002 8:32 am
- Location: Central Michigan
- Contact:
While clamping a part in my bench vise yesterday, I broke the vise. The jaw snapped in two! It was a 5-inch Harbor Freight model my dad bought me years ago. I'm on my way to Sears to get a new one, but they are all made in China too...hope the new one had better quality control when it was manufactured.
Yesterday I cut and formed 5 parts. The most difficult one was the rudder bottom rib, which also acts as the skin at the bottom of the ruder. After I formed the part, it looked a little short. I had to remake the part, because I'd accidentally used the rib length measurement as the overall length, including the flange tab. So it was 18mm short. Oh well...not that hard to make a new one. I'm sure I'll have to remake a few parts over the course of the build. However, the experience has reminded me to pay a little closer attention to what I'm doing. The rest of the parts turned out just fine.
Yesterday I cut and formed 5 parts. The most difficult one was the rudder bottom rib, which also acts as the skin at the bottom of the ruder. After I formed the part, it looked a little short. I had to remake the part, because I'd accidentally used the rib length measurement as the overall length, including the flange tab. So it was 18mm short. Oh well...not that hard to make a new one. I'm sure I'll have to remake a few parts over the course of the build. However, the experience has reminded me to pay a little closer attention to what I'm doing. The rest of the parts turned out just fine.
If you take away their comforts, people are just like any other animal.
-
UncleJoseph
- Wuffle Initiate
- Posts: 1087
- Joined: Tue Jun 11, 2002 8:32 am
- Location: Central Michigan
- Contact:
Got my new vise...just realized my HF model was only a 4". My new Craftsman model is a 5", and what a beast! Way nicer than my HF model...$65 well spent & a 1-year warranty...if it's gonna break, it'll break in the next month because I plan on abusing the hell out of it. The 5" will make a difference too, since it'll be easier to clamp some of the larger parts, such as the wing ribs...
If you take away their comforts, people are just like any other animal.
-
UncleJoseph
- Wuffle Initiate
- Posts: 1087
- Joined: Tue Jun 11, 2002 8:32 am
- Location: Central Michigan
- Contact:
Okay, so 4/5 years later, I am getting close to having my new shop in my garage set up. Worked all day yesterday on a new construction table and work bench. Tonight, I'll try t get everything organized. I stopped working on the project back toward the end of 2011 because we decided to do some rehab on the old house. That, plus building the new house and all the improvements I've made since we moved in have taken the bulk of my free time.
But I'm finally back in a position to work on the plane. Just gotta get the darn shop cleaned up and organized. The new job has no overtime, so I have more spare time on my hands than ever before. A few projects around the house still need attention, but I hope to have an actual plane structure like the rudder completed in a month. Then I'll work on some of the other structures. I'll be posting my progress as I go.
But I'm finally back in a position to work on the plane. Just gotta get the darn shop cleaned up and organized. The new job has no overtime, so I have more spare time on my hands than ever before. A few projects around the house still need attention, but I hope to have an actual plane structure like the rudder completed in a month. Then I'll work on some of the other structures. I'll be posting my progress as I go.
If you take away their comforts, people are just like any other animal.
-
UncleJoseph
- Wuffle Initiate
- Posts: 1087
- Joined: Tue Jun 11, 2002 8:32 am
- Location: Central Michigan
- Contact:
Getting even closer. Shop area is mostly cleaned up. Started finding all my tooling that was packed away from the move. Even found some time to review the instructional videos. Trouble is, I'm broke right now. While I have lots of materials to work with, I don't have quite everything I need....mainly an 8' bending brake. Steel prices are insane, so just buying the 3 pieces of 3"x3"x8' pieces of angle iron I need to build the brake are $160. Then I still need the piano hinge, some assorted hardware and the steel for the handle. So I'll probably be in the neighborhood of $175-200 before it's all done, then I have to build and paint it. All that just to bend the damn flanges on my rudder spar. But, once the brake is done, I can bend a ton of parts and start cranking away. Plenty to do without it, but I actually want to put something together for a change! Oh well.
If you take away their comforts, people are just like any other animal.

-
UncleJoseph
- Wuffle Initiate
- Posts: 1087
- Joined: Tue Jun 11, 2002 8:32 am
- Location: Central Michigan
- Contact:
In my review of Zenith Aircraft's website for updates on my plane's design, I discovered they released the 3rd Edition drawings back 2012. This was short after I stopped working on the plane. I was able to see which blueprint pages had been replaced by the 3rd edition drawings, but not the drawings themselves. I had to order those for $75. The new drawings incorporate some features that will make construction easier and increase resale appeal/value. One example is the larger cabin height and bubble top canopy.
Unfortunately, this means I may need to make some of the parts again. A few of the drawings replace the blueprint pages for the rudder parts I've already made. Fortunately, have't yet made a ton of parts. In addition, I've laid out the wing ribs to start making the forming blocks, and the wing ribs blueprints will be updated with the drawings. So it's good I haven't started cutting on those just yet. I may get lucky and find that specific things I've already done won't need to be changed, but we'll see.
Pictures to follow soonish.
If you take away their comforts, people are just like any other animal.
-
UncleJoseph
- Wuffle Initiate
- Posts: 1087
- Joined: Tue Jun 11, 2002 8:32 am
- Location: Central Michigan
- Contact:
Updated drawings arrived today. I was expecting only the drawings that were affected by the updates (roughly 20-30 pages). Instead, my $50 got me a completely new set of blueprints updated to 3rd. Edition. Not bad!
After a careful review, I only need to re-make one forming block, but the actual parts I've already made are good to go. Funny...the forming blocks take rather a long time to lay out, cut, shape and sand. The parts themselves take maybe 1/4 of the time to make on the forming blocks. But not too bad considering I already made several parts.
Today I also did a down and dirty paint job on the parts for the new brake to prevent corrosion. I had some old spray paint lying around that was just enough to get a double coat on the contact surfaces and a single coat on the non-contact surfaces. I'll sand the contact surfaces with some ultra-fine grit paper to even out the paint and imperfections on the surface. Then they'll be ready for assembly. If all goes as planned, I'll have that done tomorrow.
I can also get back to laying out my forming blocks. All told, I need 22 forming blocks for the various ribs in the rudder, horzonal stabilizer, elevator, slats, flaperons, wings, firewall and instrument panel. Most of the blocks require a mirror image for right and left ribs.And I plan to also make cutting templates for any of the ribs that are made in quantity (wings, slats and flaperons).
I also need to make flanging dies in 2", 2.5", 3.75" and 4.5" diameters to flange the lightening holes in the ribs/bulkheads. Of the woodworking portion of the project, these are the hardest to build.
Lots of work just to start manufacturing the parts. Tons of work once the parts are made. I think I'll build in sub-assemblies just to be able to see some progress (i.e. I'll make all the parts for the rudder, then build the ruddder, before I make the parts for other assemblies). I'd like to do all the forming blocks at once, however, since that tends to be a ver dirty/dusty job, and I'd rather not have constant cleanliness issues in the shop.
I've already made the forms for the rudder tip rib, rudder nose rib, horizontal stabilizer nose rib, horizontal stabilizer rear rib and horizontal stabilizer tip rib...just need to remake the tip rib form.
If you take away their comforts, people are just like any other animal.
-
UncleJoseph
- Wuffle Initiate
- Posts: 1087
- Joined: Tue Jun 11, 2002 8:32 am
- Location: Central Michigan
- Contact:
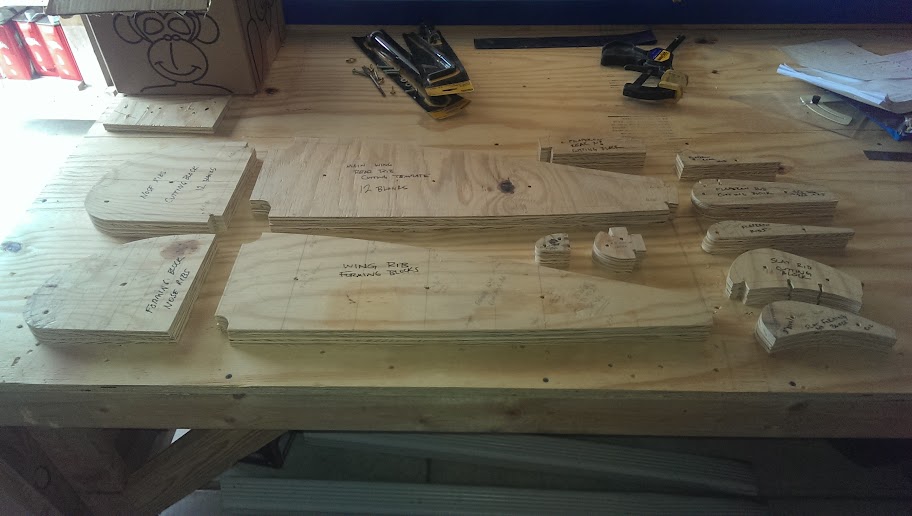
Here are the forming blocks and cutting templates for the main wing structures. Wing nose rib, wing main rib, flaperon full rib, flaperon nose rib, flaperon rear rib, slat rib. I still have to put a bevel and relief channels in most of them, but I ran out of sanding belts. They should be here on Tuesday. Should have these, plus the 8 other ones I need to make, done by next weekend. After they are all done, I'll switch to making metal parts.
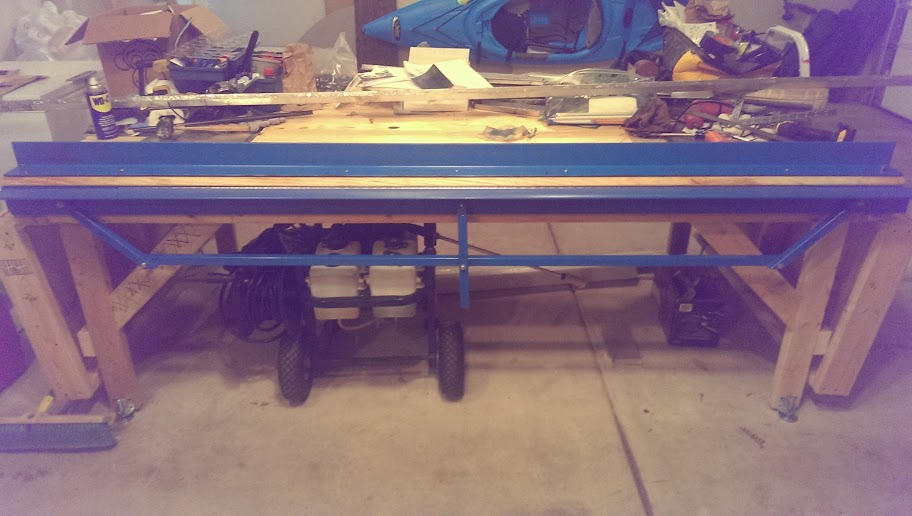
And here is the 8' bending brake I made. I used with a piece of oak under the angle so I could precisely control the bending radius (1/8"). I need to experiment with a couple test pieces to get the set-back properly rigged on the bend line. Should only take about an hour.
If you take away their comforts, people are just like any other animal.
-
UncleJoseph
- Wuffle Initiate
- Posts: 1087
- Joined: Tue Jun 11, 2002 8:32 am
- Location: Central Michigan
- Contact:
Now for some real progress...
Here are all the forming blocks and cutting templates for every rib in every structure of the plane...22 sets of forming blocks and 6 pairs of cutting templates. I re-made the ones I cut 3.5 years ago, found a flaw in my approach, and it caused kinks in the metal. I had only made a few parts for the rudder and a few for the horizontal stabilizer. I'll keep the rudder ribs that I made, but all the other form blocks (horizontal stabilizer ribs - 3 sets) I originally made were scrapped and new ones made this week.
The form blocks:
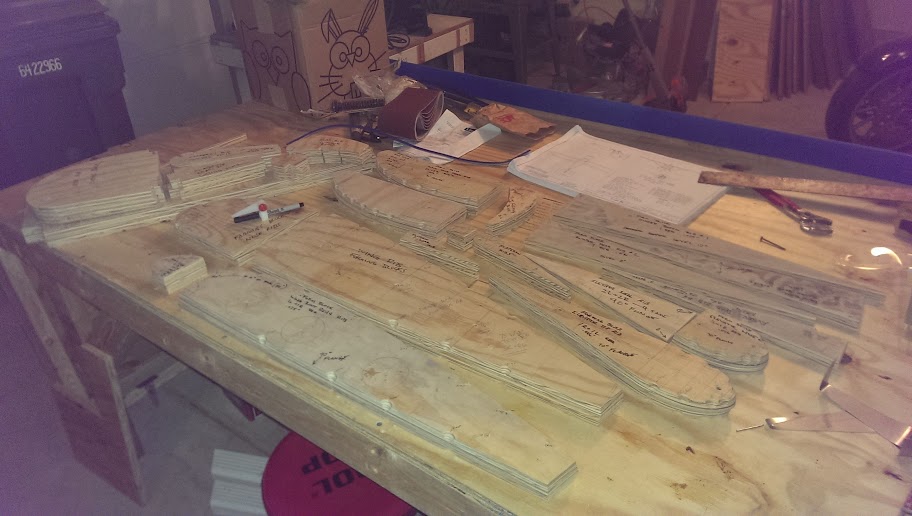
The rudder nose & tip ribs I can keep:
Here are all the forming blocks and cutting templates for every rib in every structure of the plane...22 sets of forming blocks and 6 pairs of cutting templates. I re-made the ones I cut 3.5 years ago, found a flaw in my approach, and it caused kinks in the metal. I had only made a few parts for the rudder and a few for the horizontal stabilizer. I'll keep the rudder ribs that I made, but all the other form blocks (horizontal stabilizer ribs - 3 sets) I originally made were scrapped and new ones made this week.
The form blocks:
The rudder nose & tip ribs I can keep:
If you take away their comforts, people are just like any other animal.
-
UncleJoseph
- Wuffle Initiate
- Posts: 1087
- Joined: Tue Jun 11, 2002 8:32 am
- Location: Central Michigan
- Contact:
Spent about two days worth of working on the flanging dies for the lightening holes in the ribs and bulkheads. This appears to be a task beyond my comprehension or skill level. After several attempts to make the 2" die set and one attempt at a 2.5" die set, I simply cannot get a consistent flange around the hole. I may have slightly better luck with a press than the hammering method, but the hammering method is the one the designers say to use. The flange is lopsided on each test piece (about 12 so far), and I cannot seem to figure out why. There is an acceptable margin for error, but I'm way past that with my test pieces. After burning through probably $20 in lumber and $40 in aluminum test pieces, I broke down and bought at $20 flange making tool. It i s a low-rent, down and dirty way to make flanges, but it will produce them for me in a consistent fashion. It'll just take a lot longer. They make a $200 version of the tool that is faster and produces more uniform flanges, but I'm not sure I want to spend that cash. Very frustrating, but I can still make lots of parts.
If you take away their comforts, people are just like any other animal.
-
UncleJoseph
- Wuffle Initiate
- Posts: 1087
- Joined: Tue Jun 11, 2002 8:32 am
- Location: Central Michigan
- Contact:
The other option would be to have the dies professionally made out of steel or wood on a lathe, or find someone to make plastic ones. The problem is that the only company I found willing to do them, was going to do them in carbon steel and wanted $1000. No thanks.
If you take away their comforts, people are just like any other animal.
-
UncleJoseph
- Wuffle Initiate
- Posts: 1087
- Joined: Tue Jun 11, 2002 8:32 am
- Location: Central Michigan
- Contact:
Well, I've been hard at work since my last post. Put in some serious hours on the plane, and have some real progress to display:
Start with wooden cutting templates and form blocks for the ribs:

Flat aluminum sheet (no, really...just flat 4' x 12' sheets of aluminum):

Various parts blanks:

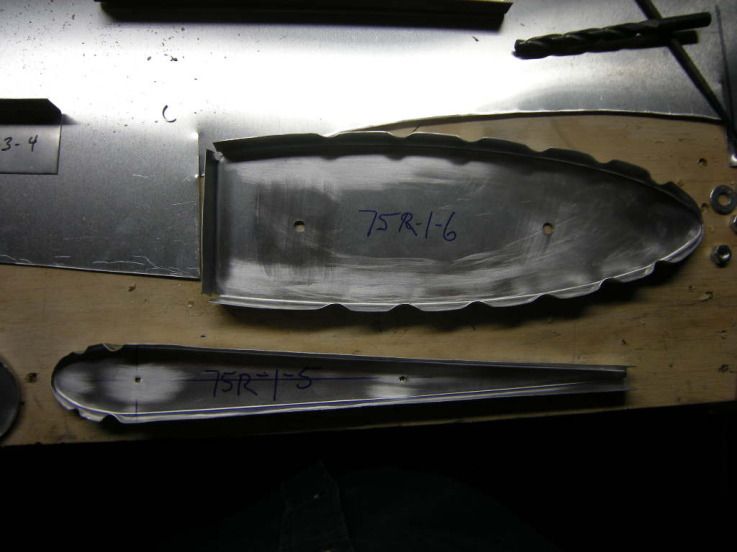
Various parts formed from the thin aluminum sheets:


.125" aluminum plate parts (these get cut on the band saw and finished on the disc/belt sander):


Rudder horn (this part was a bitch due to the bend. .125" aluminum plate is very, very hard to bend at the right radius):

Formed Elevator Nose Rib:

Rudder skeleton clamped together:

Hoping to have the skins on the rudder skeleton by the end of this week! More to follow...
Start with wooden cutting templates and form blocks for the ribs:
Flat aluminum sheet (no, really...just flat 4' x 12' sheets of aluminum):
Various parts blanks:
Various parts formed from the thin aluminum sheets:
.125" aluminum plate parts (these get cut on the band saw and finished on the disc/belt sander):
Rudder horn (this part was a bitch due to the bend. .125" aluminum plate is very, very hard to bend at the right radius):
Formed Elevator Nose Rib:
Rudder skeleton clamped together:
Hoping to have the skins on the rudder skeleton by the end of this week! More to follow...
If you take away their comforts, people are just like any other animal.
-
sinsual
- Bondsman of the Crimson Assfro
- Posts: 2192
- Joined: Thu Jun 20, 2002 7:14 am
- Location: Down the rabbit hole...
- Contact:
Are you annealing the aluminum before forming it?
www.evieshope.com
No infant should have Eye Cancer...
No infant should have Eye Cancer...
-
UncleJoseph
- Wuffle Initiate
- Posts: 1087
- Joined: Tue Jun 11, 2002 8:32 am
- Location: Central Michigan
- Contact:
No. It gets formed as is. A few people have suggested annealing it in some of the tighter radius areas, but there's a reason this alloy was chosen (largely for its rigidity), so I don't want to soften it. The parts that are the hardest to form are the places that shape the noses of the aerodynamic structures, such as the leading edges of the wings, rudder, flaperons, slats, etc. Annealing would certainly work, but the real solution is to cut the parts blank to the correct dimensions before forming. It takes some trial and error, but when everything's right, the radius forms without cracking or bottle-capping with excess material.
If you take away their comforts, people are just like any other animal.
-
UncleJoseph
- Wuffle Initiate
- Posts: 1087
- Joined: Tue Jun 11, 2002 8:32 am
- Location: Central Michigan
- Contact:
I probably won't post anymore progress pics for a while, aside from few major milestones. I've started a blog, so if anyone cares to see my progress, you can subscribe and follow at gregsplane.blogspot.com.
I'll be posting regularly (hopefully at least weekly) updates with pictures and videos.
I'll be posting regularly (hopefully at least weekly) updates with pictures and videos.
If you take away their comforts, people are just like any other animal.